jsinfor - Microsoft Office
JS Infor
  HOME
  BOOST S C Fitness
  TRIATLO
  Ciclismo
  Atletismo
  Eventos
  Contacto
  Downloads
  Ginasio
  Hobbies
  Informatica
  => Utility
  => WINDOWS7
  => NETWORK
  => NETSTAT
  => Change Logon Screen on Win7
  => Power button action Change
  => Security
  => Forgot PassW7
  => SoftMagalhes
  => ERROR Win
  => CopyPasteError
  => Partition
  => NUM LOCK Active
  => Microsoft Office
  => Command's
  => Dicas&Truques
  => Visual Basic
  => JAVA
  => BIOS
  => Barcode
  => REGEDIT
  => RUN
  => GODMODE_Windows
  => Excel
  => Win7 Welcome Screen doesn't display user account
  => Serviço de perfis de utilizador falhou
  => Forgot password Win7
  => Remover Fast Start
  => Android
  => Security browser
  => Digital Attack Map
  => Cubic
  => SQL Developer
  => RemoteConnection OnOff
  => WindowsStartUp8-9-10
  => HashCode
  => Windows10
  => Task Scheduler
  => Battlefield1_DriverError
  => Erro do servidor: 3219 Windows Live Mail
  => ERD Commander
  => USB BOOT
  => How to Create a Bootable USB Fdisk
  => Enable Multiple Cores CPU Power
  => Optimize PC And SSD Space
  => Deletes empty folders
  => Image Resizer
  => Error DLL Removel
  => Windows.old
  => Boot Bios Keys
  => ASUS
  => Win Checker 32or64bit
  => WI-FI Password
  => Windows Desktop Background Lock
  => USB BOOT ISO WIN
  => BATCH_NERWORK_MAP
  => WINDOWS 10
  => MODE Security F8
  Links Uteis
  MOBILES
  Donate
  Vesitados
  World Time
  News
  Medecina
  Especial
  Anedotas
  Matematica
  Alimentar
 
 
  People forever


MICROSOFT OFICE  LTSC Profissional PLUS 2021

https://www.youtube.com/watch?v=oX-ZQi3ycSo
 
 
Metedo 1
Link per scaricare l'odt che installa office: https://www.microsoft.com/en-us/downl...

Link per creare il file di configurazione: https://config.office.com/

Link con i codici MAK: https://docs.microsoft.com/en-us/Depl...
 

C:\WINDOWS\system32>cd c:\office2021
 
c:\OFFICE2021>setup.exe /configure configuração.xml
+-+-+-+-+-+-+-++--+-+
# ON ERRO ACTIVATION#
"OSPPREARM" Boton right run administrator

Or
Metedo2

Free Product key for Microsoft office 2021

KDNJ9-G2MPB-HWJB4-DC6C2-DDCWD
NMMKJ-6RK4F-KMJVX-8D9MJ–6MWKP

Other Office 2021 activation keys:

KJH3GF-NBV4GT-GFX4BN-JH8BVC
BVC1FD-JHGV2C-JHB8VC-KJH9GF
ZXC2V-JHGF7E-ASDF5G-LKJH3GK
PIU4YT-HG7FD-EW6QP-HGFD8QA

How to activate the Microsoft office 2021 product key?

Step 1:

First of all, download ms office 2021 setup and install it.

Step 2:

Next, open any office application like word, excel, PowerPoint, etc.

Step 3:

Now, navigate to file >> Account.

Step 4:

Here, you can see the product’s activation status if it says that it is activated when you are done. But if it says product activation required, enter the product key given above and validate it.

Activate MS Office 2021 Using CMD [Free Method]

1. Run Command Prompt (CMD) as Administrator

After installing MS Office 2021, go to search bar and type cmd. Right click on it and select “run as administrator”.  A dialogue box will appear to ask your permission click on “Yes”.

Activate MS Office 2021 using cmd

2. Now, you have to specify the Office 2021 install location. You can enter below code for 32-bit and 64-bit version.

cd /d %ProgramFiles%\Microsoft Office\Office16
cd /d %ProgramFiles(x86)%\Microsoft Office\Office16

Microsoft Office 2021 installation location

3. Now you have to convert MS Office 2021 retail license to volume license. Use below code to covert.

for /f %x in ('dir /b ..\root\Licenses16\ProPlus2021VL_KMS*.xrm-ms') do cscript ospp.vbs /inslic:"..\root\Licenses16\%x"

Press Enter.

4. Enter following command, before that make sure your system is connected to Internet.

cscript ospp.vbs /inpkey:FXYTK-NJJ8C-GB6DW-3DYQT-6F7TH
cscript ospp.vbs /unpkey:BTDRB >nul
cscript ospp.vbs /unpkey:KHGM9 >nul
cscript ospp.vbs /unpkey:CPQVG >nul
cscript ospp.vbs /sethst:s8.uk.to
cscript ospp.vbs /setprt:1688
cscript ospp.vbs /act

Then press Enter.
OUTLOOK

Change the font or font size in the message list

To scan through your Inbox more quickly, you may want to enlarge the text in the subject lines and column header, or change their font so they’re easier to read.

Illustration of increasing font size in the message list

  1. Click Mail.

    Mail icon

  2. Click View > View Settings.

    Click View Settings on the View tab.

  3. Click Other Settings.

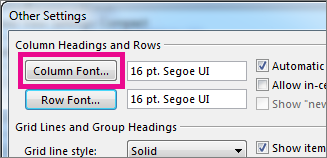
  4. To change the font or font size for the column headers in your Inbox (like “From” and “Subject”), click Column Font, and then make the desired adjustment.

    Click Column Font, and then make your selections

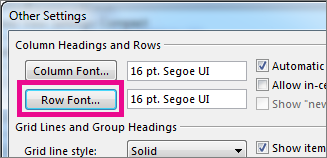
  5. To change the font or font size of the message subject lines in your Inbox, click Row Font, and then make the desired adjustment.

    Click Row Font, and then make the selections you want.

Temporarily enlarge an email in the Reading Pane

In the Reading Pane, you can also make the contents of an email larger, so it’s easier to read.

However, increasing the size of the text in the Reading Pane only works on the email you are currently looking at. When you click on another email, the body text will return to the default font size.

  1. Click once on the message you want to preview in the Reading Pane.

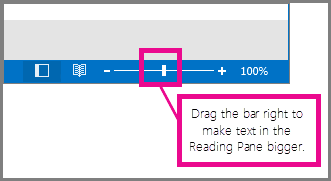
  2. In the bottom right corner of the Outlook window, drag the zoom bar right (for larger text).

Move the bar right to zoom in.


RULES and ALERTS
 
SEND and ALERTS

Send After 1 Minutes


ACCESS
DoCmd.RunCommand acCmdWorkgroupAdministrator

Ctrl+G


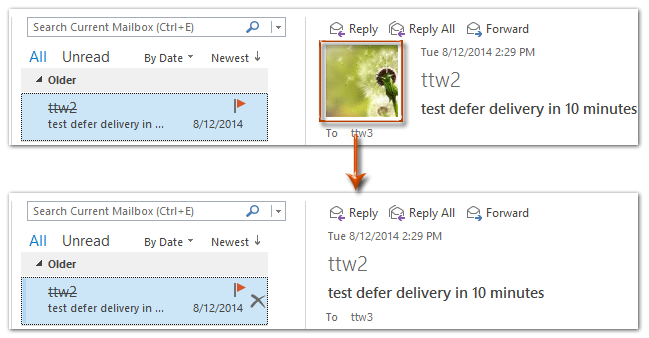
How To Hide Contact Photos In Emails In Outlook?

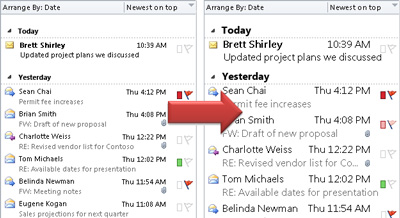
In Outlook 2010 and 2013, contact pictures will display at the message header automatically if we have added pictures for the message senders or recipients. However, In Outlook 2013 even there are no contact pictures for associated senders or recipients, it also displays a blank picture placeholder. Some user may think the blank placeholder inconvenient. In this article, I will show you how to hide the contact photos in emails in Outlook.

Office Tab - Enable Tabbed Editing and Browsing in Office, and Make Work Much Easier...
Kutools for Outlook - Brings 100 Powerful Advanced Features to Microsoft Outlook
  • Auto CC/BCC by rules when sending email; Auto Forward Multiple Emails by rules; Auto Reply without exchange server, and more automatic features...
  • BCC Warning - show message when you try to reply all if your mail address is in the BCC list; Remind When Missing Attachments, and more remind features...
  • Reply (All) With All Attachments in the mail conversation; Reply Many Emails at once; Auto Add Greeting when reply; Auto Add Date&Time into subject...
  • Attachment Tools: Auto Detach, Compress All, Rename All, Auto Save All... Quick Report, Count Selected Mails, Remove Duplicate Mails and Contacts...
  • More than 100 advanced features will solve most of your problems in Outlook 2010-2019 and 365. Full features 60-day free trial.
 

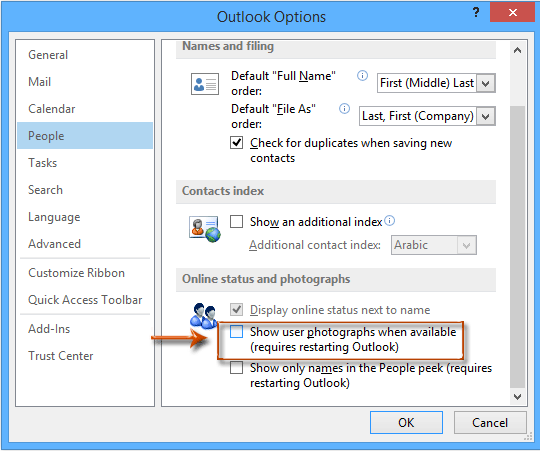
To hide contact photos in email messages in Microsoft Outlook 2010 and 2013, you can do as following:

Step 1: Click the File > Options to open the Outlook Options dialog box.

Step 2: In the Outlook Options dialog box, click the People (or Contacts) in the left bar, then uncheck the option of Show user photographs when available in the Online status and photographs section.

Step 3: Click the OK to close the Outlook Options dialog box.

Step 4: Restart your Microsoft Outlook.

From now on, you will see all contact pictures/photos are hidden from the email messages, and you will not view the blank photo placeholder either.

Notes:

(1) Because we have hidden the contact pictures from the email headers, it remains the blank picture placeholders in the People Pane. You can turn off the People Pane with clicking the People Pane > Off on the View tab.

(2) Although we can add photos for contacts in Outlook 2007, the contacts’ photos don’t display in associated email messages.


EXCEL

Formulas


Como refazer numa coluna nova, retirando o que se pretende.
Ex.: g_meh400memmh400dirMRW

h400dirMRW ( formula ) =RIGHT(A2;LEN(A2)-12)
                       Descrição   direita  |A2=coluna*| ; |LEN=posição(A2)* !-12=posição


Quando se pretende calcular valores de pesquisa de testo de diferentes registos

=SUMIF(calculo!$J$2:$J$1474;"nome*";calculo!$Q$2:$Q$1474) + SUMIF(calculo!$J$2:$J$1474;"xpto*";calculo!$Q$2:$Q$1474)

SUMIF >NOTA: em código simples só é permitido uma formula mas com + ja funciona


=SUMIFS(Main!$O$2:$O$1860;Main!$U$2:$U$1860;"bounty*";Main!$V$2:$V$1860;">="&$A$2;Main!$V$2:$V$1860;"<="&$B$2)+SUMIFS(Main!$O$2:$O$1860;Main!$U$2:$U$1860;"mission*";Main!$V$2:$V$1860;">="&$A$2;Main!$V$2:$V$1860;"<="&$B$2)

SUMIFS
>NOTA: permite concatenar / encadear conforme formula e valores


Copyright © 2011, JS-Infor. All Rights Reserved.

eXTReMe Tracker

Licença Creative Commons

Licença Creative Commons
Este sitio web fue creado de forma gratuita con PaginaWebGratis.es. ¿Quieres también tu sitio web propio?

Registrarse gratis